Once a content item has been created and uploaded, it’s time to publish it to the appropriate places.
When you first put together a content item and click “Create”, you will then have the option to publish it immediately. If you want to re-publish an existing item, open it by selecting it in the Content Manager listing and click “Add Scheduling on Channels”.
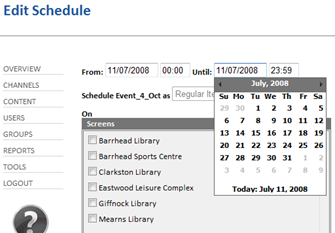
You can schedule a content item to appear at a specific date & time by selecting the date from the calendar and specifying the time in the “From” field. This can be useful if you don’t want a message to appear straight away.
Equally, if a message has a particular shelf-life (e.g. it publicises an event), you can specify it to be taken down at a specific date & time, by altering the “Until” field.
Hint: When using the calendar, clicking the month name to see the full year. If you then click the year name, you will see a list of years.
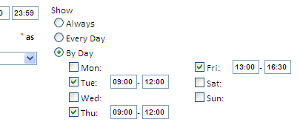
It is possible to schedule content so it only appears on certain days of the week or at certain times. To do this select one of the "Show" options. Selecting Always means that the content will be shown whenever its position in the schedule is reached. Selecting Every Day and setting a start and end time will mean a content item is only shown between those two times for example if you wanted a content item to only be shown in the morning. By Day allows you to set the times each day that you want it to be shown between giving you full control over which day the content is shown as well as which time.
Next select which level of priority you would like to give the content schedule from the drop down menu. The options are:
- Regular Item: The content item will be displayed as part of the regular content loop.
- Alert Item: When any one or more alert items are scheduled, any regular level items will be not be displayed. This can be useful if you wish to shown only a select few items for a short period of time, as you do not need to remove the other (regularly scheduled) items - they will simply be hidden. Once the alert item(s) have ended, the regular items will return to the display.
- Timed Item: This is normally of use for specific extremely high priority and time sensitive items. There can only be one Timed Item per zone at any one time. Any other Regular or Alert level items will be ignored during this time.
After determining when the message will appear, you can then select where the message will appear. You can choose to deploy the message to individual channels by checking the box beside the channel name. You can publish a message to as few or as many channels you require.
If you want to publish the message to a number of different channels, it may be easier and quicker to select one of the channel groups. This will create schedules for the message on every channel in the group.
You can check the "Notify me" check box and enter a number of days which will enable Email Notification of this schedule finishing. You need to have an email address registered with your username for this to work. If you have selected this option you will be sent an email the requested number of days before the “Finish” date to remind you that your schedule is about to end.
Once you click schedule you will see a list of the selected channels and their zones. If the channels all feature the same zone layout you can check "Apply To All" and only need to then select a zone for the first channel which will then be applied to the other channels. If the layouts are not the same then each zone must be chosen separately. If the target zones aspect ratio does not match that of the content item a warning will be displayed beside the zone name.
Once an item has been scheduled, it will instantly appear on WebTV, Podcasts and RSS feeds. It will display On-Screen within 5-10 minutes (notwithstanding any network traffic/congestion) at the correct place within the programming loop for the zone. N.B. When scheduling an item to a screen, it will cause the content schedule (on each screen) to re-start on screen upon the next check in, immediately ending any currently playing items.
Encoding
The only caveat to instant appearance is related to video and PowerPoint items, which undergo an automatic “transcoding” process on the Solus Distribution Server to prepare them for use on the appropriate channels. Multiple copies of the video message are created for use with different output locations and user bandwidths.
The length of time for this process to complete is variable dependent on the length/size of the original file, its complexity, the number of output formats required and the number of items already in the encoder queue.
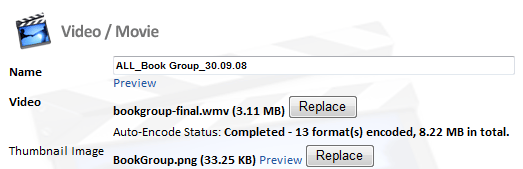
You can see the status of the encoding process by re-opening the content item (click its name in the Content list). The current status is displayed beneath the “Video file” name. The status can appear in a number of phases:
- “Waiting for encoder” – The item is waiting for the encoder to initialise
- “Queued by encoder” – The item has been queued by the encoder, there are other items currently being encoded
- “Encoding” – The item is currently being encoded. The number of output formats and the current format being encoded are displayed.
- “Completed” – The item has been successfully transcoded and is ready for deployment.