The details for each channel can be accessed by clicking on the name of a channel on the Channel Manager listing. N.B. Any changes to these settings will cause the content schedule to re-start on screen upon the next check in, immediately ending any currently playing items.
Channel Settings
The Channel Settings tab allows you to view and (depending on permissions) modify settings for each individual channel. From here you can specify the following settings:
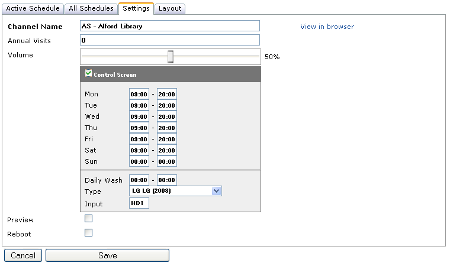
Channel Name:
The name of the channel as it appears within the admin system. This will appear in the Channel Manager and any content schedules that are created.
It is normal practice to use a name that uniquely defines the geographical location of the screen, e.g. “Community Centre Entrance Walkway” would denote a screen that resides in the entrance walkway of the Community Centre.
View in Browser:
This opens a new window in your browser which displays a scaled replica of your channel and previews the scheduled content. Please note that some content may not be able to be displayed in your browser, so all content items scheduled may not be able to be previewed this way. The content will still be displayed on your screen though. The scheduled content for each zone will loop through in order, although you can skip backwards and forwards through the schedule by selecting a zone from the drop down list and then pressing the backwards or forwards buttons. If you skip forwards on the last item of a schedule it will go back to the first item.
Volume:
The overall volume of the screen expressed as a percentage from 0 – 100%. This affects all content items that are scheduled to the screen, and is best used to suit the volume level to the ambient or background noise in the immediate vicinity of this screen. This only applies to screens that are controlled.
Annual Visits:
Specify the total number of people that walk past this screen. This is only necessary for use with the reporting management features; it has no bearing on the operational aspects of the system.
Preview:
Instruct the channel to download the zone layout and content of a different channel. This can be used to preview the exact display of another screen without modifying the scheduling and zone layout of this screen. To enable this check the checkbox and then select a channel from the drop down menu that appears. While this option is selected the screen will show what is being displayed on the selected channel. Un-checking this box will change your screen back to showing your scheduled content and layout.
Control Screen:
Allows the screen to be powered on & off at the specified times – normally the opening hours of the building that houses the screen. In addition, it enforces the set volume for the channel and locks down any buttons on the device itself. This deters any physical tampering with the units inputs in-situ. The type of screen is also recorded here so it can be remotely controlled. The time of a daily wash can also be set. This is only applicable for certain types of screens, such as plasma screens, and is used to help prevent image retention or screen burn. This is not relevant for LCD screens or projectors.
Reboot:
If there is a problem with a remote screen, you can check this box to schedule a reboot. The screen will be rebooted when it next checks in.
Active Schedule
From here you can edit the ordering of content for each specific zone. See Content Ordering for more information.
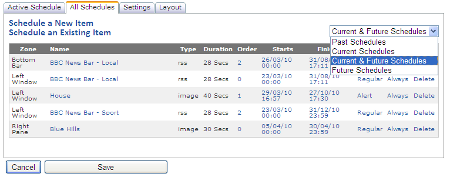
All Schedules
The “All Schedules” tab provides a listing of all schedules across all zones in an at-a-glance format.
You can also see previous schedules that have either already reached the end of their scheduling or have been manually removed.
In addition, you can define between current schedules and future schedules, as opposed to the default combined view.
Layout
The "Layout" tab allows you to view and (depending on permissions) modify the configuration of each individual zone on the channel. You may wish to re-size or move the placement of a zone within the screen area. It also allows you to change to a different zone template layout or create a new zone template layout. It features a graphical user interface that allows you to drag and drop zones on the screen area and to resize them with your mouse. Zones can also be positioned and resized by entering values into the size and position textboxes under the screen area.
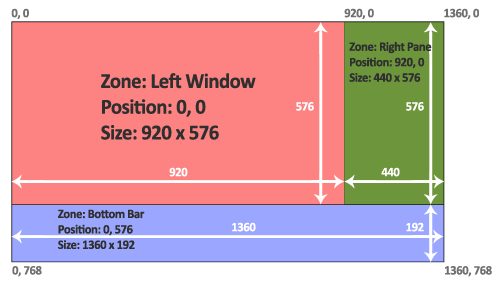
The width and height are simple pixel measurements and can be amended according to the needs of the content.
The positioning of each zone is based on a standard X, Y co-ordinate system using the normal web-based practice of having the origin (0,0) at the top left-hand corner of the screen. As with the dimensions, this is based on simple pixel measurements.
When the Layout tab is selected it will show the zone layout for the channel. 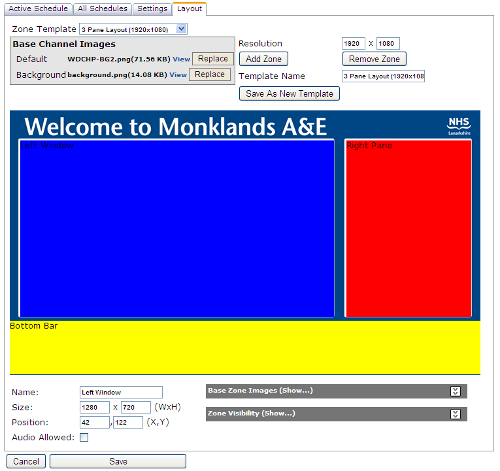 The editor is a scale model of how the channel's zones will be positioned on the screen. The screen is represented by the black rectangular area unless a background image has been specified. In this case the image will fill up the screen area. The zones are the different coloured rectangular objects. Each zone has a label in its top left corner showing its name. To move a zone click on it and keep the mouse button held down while you move it around the editor area. When you have positioned it where you want it release the mouse button and the zone will now be positioned there. Zones must fit inside the screen area so cannot be moved across the borders of the screen.
When a zone is selected (by clicking on its rectangle), its details will be shown in a panel below the screen area. The zone can also be moved by entering values into the position X and Y text boxes which appear below the screen area. If values are entered that would result in the zone being outside the screen area, the values are adjusted so it will fit, e.g. if the new values would result in the right side of the zone crossing the right border of the screen area it will be positioned so the right edge of the zone is at the right edge of the screen border.
When the mouse is moved over the edge of a zone the cursor is changed into a direction arrow (e.g. if the cursor is over the top of a zone it will become an up arrow). If you now click and drag the mouse the zone will resize in the direction you are moving the mouse. Again, zones must fit inside the screen area so it cannot be resized bigger than the screen area. Zones can also be resized using the Size width and height textboxes underneath the screen area. Zones can be resized diagonally, as well as horizontally and vertically, by positioning the mouse over the corners of the zone.
To add a zone, click the Add Zone button. This zone can then be renamed and positioned. To remove a zone, first click on the zone you wish to remove and then click Remove Zone. Removing a zone will clear any content scheduled to that zone.
Creating A Template:
A new template can be created by modifying a zone layout and then clicking on the "Save As New Template" button. A new name for this template must be entered into the Template Name textbox first. This new template can then be used on existing or new channels.
Base Channel Images:
These images are default branded images used at certain situations. The default image is shown when the system first starts up, before the content zone loops have been loaded. The Background image is displayed when content zones do not fill the screen area. Background images can be designed to include a logo and have spaces for all the zones.
Zone Template:
The content zones on the screen can be defined by a template chosen from this list. Changing this will cause the zone layout editor to be refreshed to display the layout of the selected template.
N.B. Changing the zone layout template will delete all current & future schedules on this channel. All schedules would then have to be re-created. This cannot be un-done once saved.
Zone Panel:
The Zone Panel appears underneath the screen area when a zone is selected. It displays the editable properties of the zone. Name, Height and Position are explained above in the Layout section. Checking the Audio Allowed option means that the zone will play sound when displaying content (if the content item contains sound). N.B. It is not recommended having more than one zone playing sound at once as this may cause audio clashing and viewer disorientation.
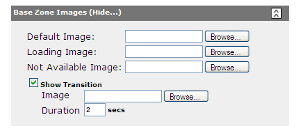
Base Zone Images can be expanded by clicking on it. Here a "Default Image" can be specified to show if no content has been scheduled to the zone at that particular time. "The Loading Image" will be shown when an RSS or URL item is downloading from the Internet. If a loading image has been specified on the actual RSS or URL item, it will supersede the image specified here.
If an RSS or URL is not available on the Internet, the stock "Not available" image will be shown. If this is not specified, the zone will automatically carry on to the next item.
A transition slide can be shown between every content item on a zone schedule. This is useful for a "branding flash" between each item. You can specify how long a transition item is displayed for (normally 2 seconds).
All images must be static JPEG or PNG files that are sized to the dimensions of the zone. If the file is not sized to the dimensions of the zone it may appear stretched or squashed when displayed on the screen.
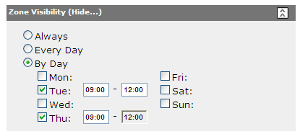
Zone Visibility can be expanded by clicking on it. This allows you to set when the zone will be displayed. By setting zones to appear at different times allows a channel to display different layouts and content at different times of the day. This allows zones to be positioned in the same part of the screen at different times of the day, which can be useful when a facility has a dual purpose (e.g. school during the day, community centre in the evenings). The different options are:
- Always, where the zone is displayed at all times.
- Every Day, where the zone only will only be displayed during the specified start and end times of each day.
- By Day, which allows you to select which days of the week the zone is shown and what times during that day it is shown.